
Visual Studio Code: Node.js with TypeScript and Debugging
Visual Studio Code is a free code editor of Microsoft with an excellent TypeScript and Node.js development support. This blog post describes how easy it is to create a new Node.js project with TypeScript support. And at the end, we will also debug a small “Hello World” example.
The example in this article provides to setup the following:
- Node.js - http://www.nodejs.org (runs on Windows, Mac and Linux)
- TypeScript
typenpm install typescript –gin the terminal - Visual Studio Code - http://code.visualstudio.com (runs on Windows, Mac and Linux)
A new project
To create a new project, the only thing we need is a new folder in our file explorer. Afterwards, we open the created folder in Visual Studio Code File | Open Folder. As project file the packages.json file is needed. To include it, we just have to write npm init –y in the terminal. You can open the integrated terminal in Visual Studio Code using the keyboard shortcut [Ctrl] + [`].

Install Node.js declaration files
To ensure that Visual Studio Code can solve Node.js features within IntelliSense, the TypeScript declaration files for Node.js are required. They will be installed with the node package manager (npm) since TypeScript 2. The command npm install @types/node --save-dev will have it done. To install other packages like jQuery for example, you would have to call npm install @types/jquery --save-dev.
TypeScript compiler configuration
For a proper Node.js support with TypeScript, a compiler configuration file is absolutely necessary. It will be created as tsconfig.json in the root directory. Thanks to the JSON IntelliSense feature of Visual Studio Code, which automatically provides an autocomplete on the basis of the filename.
So you just need to write the first curly braces and IntelliSense will autocomplete it with the shortcut [Ctrl] + [.]. The IntelliSense support only works with an existing internet connection. In this case you need write the following compiler configuration:
{
    "compilerOptions": {
        "module": "commonjs",
        "sourceMap": true,
        "watch": true
    }
}Module: In a typical web application, the browser obtains the JavaScript files via the Script tag. With Node.js, the JavaScript code will be executed irrespective of the website. This is the reason, the modul system CommonJS has been developed. It allows to load JavaScript files within the JavaScript code. Because of that, TypeScript needs to know which modul system is used, so the “import” and “export” code will be generated automatically.
Source Map: As the name suggests, debugger-service maps will be generated here. They support the debugger to solve a code area of the TypeScript file to the generated JavaScript file. So it is possible to debug right within the TypeScript file.
Watch: The watch option helps to prevent to start the TypeScript compiler before each debugging. It monitors all TypeScript files for changes. If a file changes, the compiler is automatically activated. So the compiler has to be started only once.
The first Node.js „Hello World“
Now we create an index.ts file. The following code is required for a “Hello World” example:
import http = require('http');

http.createServer((request, response) => {
    response.write('Hello from Node.js!');
    response.end();
}).listen(3000);
The first line begins with a TypeScript-specific keyword import. Thus, TypeScript knows that there must be a declaration for this module. If there is no declaration file or a TypeScript code in the project, let is written as usual. Then we access a Node.js build-in module called http. The first line is comparable to a using, import or include from other high-level languages.
From line 3, a Web server is already being created. When calling, the anonymous function is triggered and a streaming to the client is active. Here we get all client request information with the request parameter. We can use the response parameter to append data to the current stream. The simple write function was used to send a simple string value. To terminate the current stream, the end function is required.
With the listen function, the current web server is activated for the defined port. That’s it!
Start the TypeScript compiler with Visual Studio Code
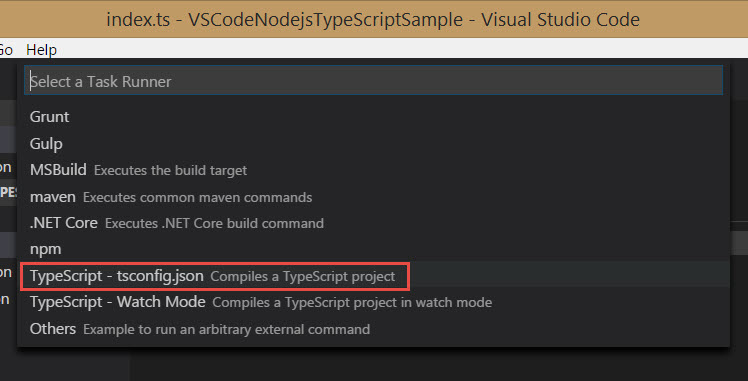
The TypeScript file was written, but a JavaScript file is needed to run it. The key combination [Ctrl] + [Shift] + [b] prompts Visual Studio Code to build the project. Alternatively, you can open the command line with [F1] and type Build. Now Visual Studio Code does not know what exactly it should do. So it will ask you, what exactly you want. We choose TypeScript - tsconfig.json here.

A new directory is created with .vscode and a tasks.json file is created. The pleasant thing about this template is that all relevant settings are already stored. So we can close this file and call the build process again with [Ctrl] + [Shift] + [b]. Left below we can see a rotating character and in File Explorer we can see two new files for our TypeScript file. One is the generated JavaScript file and the other is the SourceMap file which is required for debugging.
Debug the Node.js application
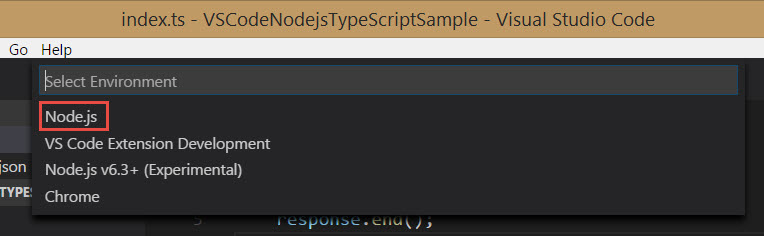
There are different ways to run the application. One way is to start from the terminal using node index.js, regardless of Visual Studio Code. The only bad thing is, we have no debugging comfort here. Therefore we use the second option: We press the [F5] key within Visual Studio Code to debug. Again, Visual Studio Code does not know what exactly it should run. We select node.js.
A further JSON file is created in the .vscode directory. It is important to note that the JavaScript file name corresponds to what we have created and that the option SourceMaps is activated. Otherwise, we can only debug within the JavaScript file. Then press the [F5] button again. The server has now been started. If we press the [F9] key in the response.write line, or alternatively next to the line number, we get a red breakpoint. Now go to the browser and call your web server with http: // localhost: 3000. Visual Studio Code then stops at the breakpoint and you can check all the parameter values as you are used to debugging other high-level languages.

If there are problems, it is mostly because you have forgotten to start the TypeScript compiler once. Therefore, check whether your JavaScript and SourceMap files were generated.
Conclusion
Visual Studio Code is a great tool for development with Node.js and TypeScript. With just a few lines of code, we have created a web server and a REST Web service. Completely without IIS, Tomcat or Apache HTTP Server. The example I have deposited here on GitHub:
Did the article help you? Do you have any questions? Then write me a comment!
